WordPress子主题官方就有个很详细的教程。
https://codex.wordpress.org/zh-cn:子主题文章源自国外主机测评-https://www.zjcp.org/15112.html
这里就讲一下本站实际使用时侯的操作步骤例子吧。文章源自国外主机测评-https://www.zjcp.org/15112.html
子主题的作用
很多时候我们需要修改主题的一些style.css之类的文件,或者在functions.php文件加一些功能代码。我们修改后,如果后期主题更新会将我们修改的文件同时更新掉。文章源自国外主机测评-https://www.zjcp.org/15112.html
子主题的功能就是能够保持主题正常更新的情况下,保留我们修改的功能可以正常使用。文章源自国外主机测评-https://www.zjcp.org/15112.html
文章源自国外主机测评-https://www.zjcp.org/15112.html
教程示例
以本站当前主题为例。文章源自国外主机测评-https://www.zjcp.org/15112.html
修改了:默认文章页面内容宽度、默认文章标题字体大小、底部footer距离文章主体内容的距离。文章源自国外主机测评-https://www.zjcp.org/15112.html
添加了:评论移除网址表单、百度快速收录 API 提交代码文章源自国外主机测评-https://www.zjcp.org/15112.html
这些修改在主题的style.cc和functions.php文件中。下面我就开始创建一个子主题。文章源自国外主机测评-https://www.zjcp.org/15112.html
原主题名字:Twenty Twenty-One
原主题目录名:twentytwentyone文章源自国外主机测评-https://www.zjcp.org/15112.html
子主题名字:Twenty Twenty-One Child
子主题目录名:twentytwentyone-child
创建子主题目录
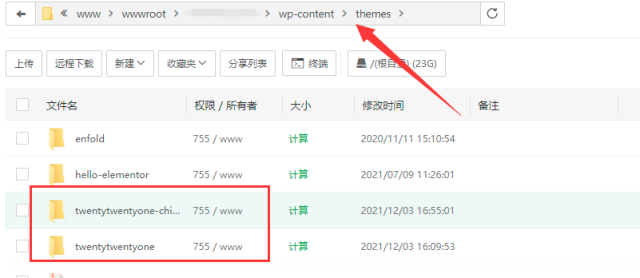
我们需要先在WordPress的主题目录wp-content/themes内创建一个子主题的目录。该目录名设为twentytwentyone-child这样比较容易区分原主题和子主题目录关系。你给子主题目录改成其他的也没关系。
子主题必须包含一些文件:
style.css (必需)
functions.php (可选)
Template files (可选)
Other files (可选)
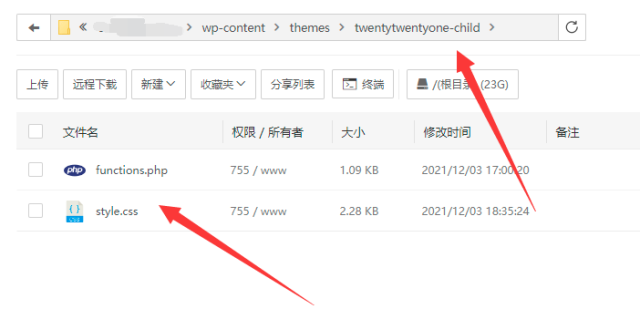
这里我们只需要在子主题目录里创建style.css和functions.php这两个即可。
创建子主题style.css文件
子主题的style.css有着固定的要求。必须包含以下头部信息:
/*
Theme Name:     子主题名字(随便写)
Theme URI:      子主题URL(随便写)
Description:    子主题的描述(随便写)
Author:         主题作者名字(随便写)
Author URI:     主题作者URL(随便写)
Template:       原主题目录名(必须准确)
Version:        版本(随便写)
*/
本站子主题的头部文件代码如下:
/*
Theme Name:     Twenty Twenty-One Child
Theme URI:      http: //example.com/
Description:    Child theme for the Twenty Twenty-One theme
Author:         Cheshirex
Author URI:     http: //www.cheshirex.com
Template:       twentytwentyone
Version:        0.1.0
*/
然后将我在原主题修改的代码复制进去。复制后整个文件内的代码如下:
/*
Theme Name:     Twenty Twenty-One Child
Theme URI:      https://www.cheshirex.com
Description:    Child theme for the Twenty Twenty-One theme
Author:         Cheshirex
Author URI:     http: //www.cheshirex.com
Template:       twentytwentyone
Version:        0.1.0
*/


:root {
	/* Spacing */
	--global--spacing-unit: 20px;
	--global--spacing-measure: unset;
	--global--spacing-horizontal: 25px;
	--global--spacing-vertical: 30px;

		/* Font Size */
	--global--font-size-base: 1.25rem;
	--global--font-size-xs: 1rem;
	--global--font-size-sm: 1.125rem;
	--global--font-size-md: 1.25rem;
	--global--font-size-lg: 1.5rem;
	--global--font-size-xl: 2.25rem;
	--global--font-size-xxl: 4rem;
	--global--font-size-xxxl: 5rem;
	--global--font-size-page-title: var(--global--font-size-xxl);
	--global--letter-spacing: normal;


}


@import url("../twentytwentyone/style.css");

.widget-area {
	margin-top: calc(1 * var(--global--spacing-vertical));
	padding-bottom: calc(var(--global--spacing-vertical) / 3);
	color: var(--footer--color-text);
	font-size: var(--footer--font-size);
	font-family: var(--footer--font-family);
}

@media only screen and (min-width: 482px) {

	:root {
		--responsive--aligndefault-width: min(calc(100vw - 4 * var(--global--spacing-horizontal)), 1000px);
		--responsive--alignwide-width: calc(100vw - 4 * var(--global--spacing-horizontal));
		--responsive--alignright-margin: calc(0.5 * (100vw - var(--responsive--aligndefault-width)));
		--responsive--alignleft-margin: calc(0.5 * (100vw - var(--responsive--aligndefault-width)));
	}
}
@media only screen and (min-width: 822px) {

	:root {
		--responsive--aligndefault-width: min(calc(100vw - 8 * var(--global--spacing-horizontal)), 1000px);
		--responsive--alignwide-width: min(calc(100vw - 8 * var(--global--spacing-horizontal)), 1240px);
	}
}

@media only screen and (min-width: 652px) {

	:root {
		--global--font-size-xl: 2.5rem;
		--global--font-size-xxl: 3.5rem;
		--global--font-size-xxxl: 9rem;
		--heading--font-size-h3: 2rem;
		--heading--font-size-h2: 3rem;
	}
}

:root .is-huge-text,
:root .has-huge-font-size {
	font-size: var(--global--font-size-xxl);
	line-height: var(--global--line-height-heading);
	font-weight: var(--heading--font-weight-page-title);
}
修改完成后保存这个文件就可以了。
建子主题functions.php文件
functions.php文件比较简单,我们只需要在文件内加上php起始标签,然后标签内放入我们添加的代码即可。
本站代码示例:
request( $api , array( 'method' => 'POST', 'body' => $url , 'headers' => 'Content-Type: text/plain') );
  $result = json_decode($result['body'],true);
//如果推送成功则在文章新增自定义栏目Baidusubmit,值为1
if (array_key_exists('success',$result)) {
  add_post_meta($post_ID, 'Baidusubmit', 1, true);
  }
  }
  add_action('publish_post', 'Baidu_Submit', 0);
  }

?>
注意事项:
style.css
子主题的style.css文件内代码和原主题是覆盖关系。一段代码我们修改后放入子主题,在我们访问网页时它会自动重写原主题style.css文件代码。
functions.php
如果你在原主题内添加了一段代码,然后创建子主题后直接将这段代码剪切到子主题文件内。不要再原主题继续保留代码。否则可能会报错。
这里子主题代码和原主题仅是子主题代码执行优先,原主题的代码会在子主题之后继续执行。子主题在父主题文件加载之前先载入。
以上操作都完成后目录是这样子:


关于子主题的更多信息,请查看本文开头的官方教程链接。


